Support / Bob PetHair / Trouble Numbers
Trouble Numbers
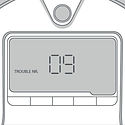
When Bob faces an uncomfortable situation, he will notify you by displaying TROUBLE NR., coupled with a two-digit number, on his screen. Each number corresponds to a certain issue Bob is having.

Trouble Number 00: Left Wheel
What to do:
- Start by checking the wheel for jamming. Use the cleaning tool or compressed air to remove any debris that may be jamming the wheel. If this does not solve the problem and Bob still displays Trouble Number 00, run a checkup test and see how the wheel performs.


Trouble Number 01: Right Wheel
What to do:
- Start by checking the wheel for jamming. Use the cleaning tool or compressed air to remove any debris that may be jamming the wheel. If this does not solve the problem and Bob still displays Trouble Number 01, run a checkup test and see how the wheel performs.


Trouble Number 02: Main Brush
What to do:
- Remove the main brush using a flat head screwdriver, and clean it thoroughly from end to end. You may use a pair of scissors to cut hair or thread wrapped around the brush, or a pair of tweezers to remove congestion from the notches where the main brush is held. If Bob displays Trouble Number 02 while cleaning on a shag carpet or rug, you may remove his main brush and allow him to vacuum without it.


Trouble Number 03: Front Wheel
What to do:
- Use the cleaning tool or compressed air to remove debris congesting the front wheel. If the congestion is not removable from the outside, detach the front wheel and remove the obstruction. If Bob’s front wheel is clean and spinning freely, his front wheel sensor may need to be replaced.


Trouble Number 04: Edge Sensors
Bob’s four, oval-shaped edge sensors are located on his underside, near his bumper.
What to do:
- Wipe the sensors using a clean cloth, or dust them using compressed air. If Bob displays Trouble Number 04 while working on dark-colored carpet or patterned flooring, you may need to deactivate his edge sensors.


Trouble Number 05: Wall Sensors
What to do:
- Use a clean, damp cloth to wipe away any debris from the strip on Bob's bumper. Gently tap the bumper or use compressed air to clear it of debris. If the issue persists, try running a checkup test.


Trouble Number 06: Touch Sensors
What to do:
- Gently tap on Bob’s bumper to clear out any obstructions. Use compressed air to clear it of debris. Press on both ends of the bumper until you hear a tiny "click." If the bumper is not clicking on its ends, Bob's touch sensors may need to be replaced.


Trouble Number 07: Main Brush Installation
What to do:
- Use a flat head screwdriver to remove the main brush and clean the ends. You may use a pair of tweezers to remove congestion from the notches where the main brush is held. Make sure the brush’s square end fits securely in the corresponding square notch in the main brush compartment.


Trouble Number 08: Dustbin
What to do:
- Remove Bob’s dustbin and empty it. Turn the dustbin around and gently wipe the two metal connectors on its bottom with a dry cloth. If the two metal connectors seem damaged, they may need to be replaced. Lastly, clean the metal contact points inside Bob where the dustbin is inserted.


Trouble Number 09: Mainboard
What to do:
- Do a mainboard reset by flipping Bob's power switch OFF and plugging the adapter from his station into the inlet above his power switch. Allow Bob to charge for 2 hours before asking him to clean again. If Bob is still displaying Error Code 09, send a short explanation to support@bobsweep.com, and leave the rest to us!


Trouble Number 10: Power System
If Bob stops working and displays Error Code 10, or displays the Error Code while on his charging station, his battery may be below the threshold needed to properly function.
What to do:
- Remove him from the station and check his battery connection. Open the battery compartment and unplug the battery. Wait 30 seconds, then reinstall the battery.
- Plug the charging adapter directly into the inlet above his power switch. Let him charge with his adapter overnight.
- If Bob is still displaying Error Code 10, he may need a replacement part. Contact support@bobsweep.com for further assistance.


.png)
